Showing posts with label rainbarrel. Show all posts

Thursday, 3 December 2009

Pulleys and Pistons

KorganIconI have a fetish for pulleys. I find pulleys and rope very interesting. Anything involving rope usually interests me. No idea why. I know about 40 different types of knot, and I know how to bind and suspend a woman securely from the ceiling.

Last week I started to sketch out some ideas for good-looking configurations of pulleys and rope. No real use for it, just to play.
(click on any image for larger image)


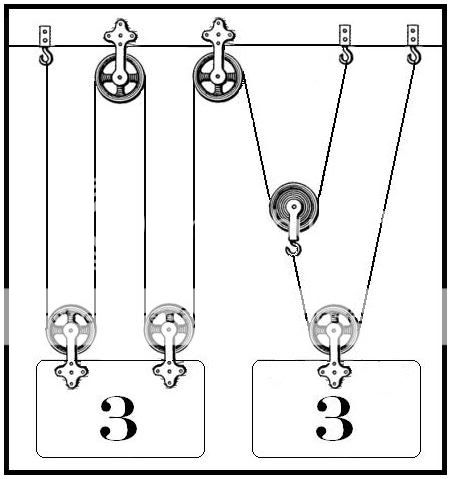
This is one way you can rig pulleys to allow a small helium balloon to lift a 1 lb weight (assuming the ropes and pulleys weighed nothing). The second sketch is two equivalent pulley systems joined together. The left side uses fixed pulleys to give a 1:4 advantage; the right side uses a movable pulley to give a 1:2² advantage. So they balance.

So I started reading about pulleys, and then I read about simple machines. I decided I wanted to design a wind-powered water pump that fits onto a standard 55 gallon food-grade barrel. This barrel is a rain barrel. The idea is that the water will be pumped to a filter, and then drain back into the barrel. With the wind powering it, the barrel will be self-cleaning. The filter will be easily removed, cleaned and replaced to continue filtering. Not only will this filter the water with no effort, it should also look awesome.

So that's where I started. I watched some videos, read about simple machines and sketched a few ideas. Then I really got into it. I figured four ways to get a fan to pump a piston.

DIRECT ROTOR TO PISTON CONNECTION

ROTOR TO PISTON VIA LEVER

ROTOR COG TO PISTON COG TO PISTON

ROTOR COG TO PISTON COG (VIA BIKE CHAIN) TO PISTON

I also figured out something that took me a while to understand. A yaw. A yaw on a wind turbine is the big wing at the back of a wind turbine that turns the turbine around so that the blades always face upwind. I couldn't figure out how to connect the turbine to a piston pump while at the same time allowing the turbine to rotate 360°. I figured it out today and did a sketch.

MECHANICAL YAW MECHANISM

The yaw wind turbine sketch isn't to scale but everything is there. I don't know the proper symbols used on professional technical drawings but hopefully it's clear. The thing in the centre that looks like a box of marbles is a type of joint that allows the piston connection to rotate above the 'box of marbles', but not below it. The other 'box of marbles' above it is to allow the entire top part of the machine to rotate. Hope that makes sense.

All these wind turbine sketches are a simple one turbine, one pump setup. I had other ideas for water pumps that pump in both directions, a couple of different ways to connect 2 pumps to one wheel, and combining those ideas together to get two double pumps connected to one wheel. I haven't sketched them yet though.

I haven't included in the sketches the valves you require for the piston to become a water pump. There should be two one-way valves (or check valves) attached to the piston at the base, one that only allows water in from the water supply, and one that only allows water out to where it's to be pumped. I was going to make these but I think bought ones would be more reliable, and their reliability is crucial.

I think this level of mechanics was probably taught in many schools to young children, but I never did this at school, so it's new. Learning a new mechanical technique is like finding a different type of Lego block, and it introduces an asston of new permutations.

Thursday, 15 October 2009

How to Build a Rain Barrel

I fitted a tap onto my rain barrel today. You can find the parts at B&Q even if their suck-ass website makes it difficult to find the parts. Here are parts you will find there:

Outside tap (£5.99):


20mm nut:


20mm wood spade bit (£7.48):


Plumber's tape(£1.93):


Drill a hole in your barrel with the spade bit at a height that makes it easy to get a watering can or bucket underneath it. If the platform your rainbarrel will rest on is high enough, you can drill a hole as low as you like.

Despite this being a non-threaded hole, you will be able to screw in the tap, forming a threaded hole on the way. You will screw it in clockwise, so wrap about 5 turns of plumber's tape anti-clockwise near the base of the screw. Screw in the tap. On the inside of the barrel, wrap more plumber's tape around the screw close to the barrel. Screw on the nut.

Keep the tap straight while you tighten the nut with a wrench. Done.

If you need to buy a 20 mm spade bit, contact me and I'll sell you mine. I bought one and drilled two holes with it and I'll never use it again.

This is how I did it and it works. If you can ask a plumber's advice, do it.

Sunday, 4 October 2009

New Gutter

The wind was pretty insane yesterday. It killed my water bottle guttering. I posted on Freecycle this morning for some guttering or a length of pipe. I got a response within 10 minutes. Someone in Northfield had a 2-metre long pipe. I went to pick it up, hitched it to my bike and cycled home. Bicycles are good.

I used a jigsaw to cut the pipe, the opening I made to 2 radians. Everything else was rope work. This new pipe works far better than the Evian bottles.


The gutter is attached to the shed with trucker's hitches. Also, I tethered the gutter to the compost heap with another trucker's hitch just in case the winds come back. I tethered the filter frame to the barrel with some hitches.

Monday, 28 September 2009

GRAVITY WORKS

If you have height in your garden, such as some steps or a sharp gradient, then take advantage of it. Build yourself some self-watering planters (SWP) and link them all up. Connect the overflow of one to the input of the next and so on. This way, you can water your plants all at once. The last overflow can go to your rainbarrel.

Make sure your overflows are at least the same diameter as your inputs, a point that's often overlooked in SWP diagrams. You can chain these up as above, or like Pascal's triangle, or as a spiral. Any way you like.

Sunday, 20 September 2009

PALLETS AT LAST

Hey guys,

Today I got wooden pallets! I've been trying to find them for almost a YEAR. No transport you see.

Today I found some pallets and took them home one at a time on my BICYCLE! Was as easy as I hoped it would be. I rested the pallet on the pedal and hooked the top corner over the handlebar.

My two compost heaps have been brewing for around a year now. I took the goodness out of them and dumped it into my raised bed. I took the unfinished stuff out of them and put that into my new pallet compost pile! AAAAGH it's awesome. :)

The compost in my raised bed is like devil's food cake. It's so damn rich and perfect and awesome. Best soil in the city I bet.

The compost heap is crooked here on the left, it was fixed after the picture was taken. You can't see in the picture, but on the left side of the bed, I've filled a gap out with cuttings off of bushes and trees. The main reason is that it looks cool and filling out spaces with woody trimmings is a great use for them, but I'm hoping a hedgehog thinks so too and moves in.

I moved my new rainbarrel under the shed, made a base of bricks for it and made a filter for it out of an old duvet cover, tied on with rope. I had to take the rainwater that was in it and decant it into buckets I made out of large plant pots and bin liners, so I could carry the barrel into place. There should be roughly 70 litres caught so far. Still need to fit a spout into the barrel but I can't find one, other than the cheap plastic ones from B&Q. I would like to find a copper one somewhere.

I have things left to do. I have to modify my Evian bottle guttering, so as to direct water to the new rainbarrel. I have to fit a spout to the rainbarrel. I have to bring home as much straw as possible for two reasons: for the new compost pile and to mulch the raised bed. There's no use making all that new soil and leaving it exposed like that. Needs a good layer of something or other.

MASSIVE SLUG IS MASSIVE

This guy slithered out of the freshly-emptied compost bin, like a drunk at closing hours. Obviously he'd been having an awesome time eating for the last 9 months. I picked him up with a leaf and put him in the new pile. I figure if I was all fat like that, I'd much rather be picked up and put somewhere to be left to keep eating. Slugs don't bother me at all. People around here kill them as readily as they used to burn witches. I'm sure I'll change my stance when I have succulent crops. Hopefully get my hedgepig before then.

Tuesday, 25 August 2009

WATER IS AWESOME

Urban Homesteaders know a lot about greywater systems. If you don’t know, household water is usually classified into 3 types:


CLEANWATER (or potable water): the stuff that comes out of your faucet. It has been processed and chlorinated and is safe to drink.
GREYWATER: the water you throw away after it’s been through your bathroom sink, your shower, your bath or your washing machine.
BLACKWATER: the used water from your toilet.


Looking at the diagram, you can see that cleanwater goes to your bathroom sink, bath, shower and washing machine, and becomes greywater. That greywater can then be re-used to irrigate your garden and to flush your toilet: (because what kind of idiots are we to flush our toilets with drinking water?? >_<)

If you live in an area of little rainfall and/or high water bills, then reusing greywater is important. If you live in an area of higher rainfall like Aberdeen, then reusing greywater may not be necessary.

However, a rainbarrel is useful in any situation. It's convenient to have an outside water source for watering plants and it can be attached to an outside sink which soiled gardener's hands appreciate. In any case, reusing water is cool and it's fun.

if you live in an area of high water bills and/or low rainfall, or you think it would be cool to learn how to build greywater systems, then become a greywater guerrilla. At the very least set up a rainbarrel. If you're resourceful it will cost you nothing. I 'reclaimed' my rainbarrel from a construction site.

TURNING RAINWATER INTO CLEANWATER
The major obstacle in water self-sufficiency is converting rainwater into cleanwater. Convert rainwater to cleanwater and your water supply is free. I know about filtration, reverse osmosis, chlorine, ozone, UV rays and solar stills. I know you can set up a system for just under £10,000 that'll give you over 45 kilolitres of storage, and give you a roof washer, ozone treatment, sediment and carbon filters and UV sterilisation. It'll pay itself off in about 6 years. I'm holding out until I learn the free method.